Arduino without arduino
Summary:
Atmega328p is the brains of an Arduino and could be used on it's own.
1) (Once only) Burn bootloader
2) Program is by plugging into your Arduino Uno board
3) move to breadboard by just providing power and an external clock.
Have your favourite blink program running for £3.
Detail:
I'm hooked on Arduino. It allows me to have a touch pad (made of foil) to toggle my LED strips in my house on and off, to have a laser trip-wire in my front garden, control my heating and provide a cool flickering-fire effect night light to my kids... but with only one Arduino board, I can only do one of these at a time.
First, I got excited about Arduino at <£20. But many times <£20 is still a lot. Then I got excited about the <$10 Arduino, and ordered a few (due for delivery very soon, I'm told).
And then, thanks to a Google-run electronics course, I discovered what many others know already. You can have all the benefits of a micro controller without an Arduino... just buy a ... micro controller.
The heart (and brain) of the Arduino is a micro controller like the ATMEL ATMEGA328P chip, which costs less than £3 each.
There is one problem with this idea: How do you get your code on it?
Simple. Just plug it into your one Arduino with a non-surface mount chip, that you can temporarily replace with your micro controller. Program it, and then use it without the rest of the Arduino board... say, on a breadboard.
But before you could do this the first time, you need to get a boot loader on the chip (once). I understand you could buy the chips with a bootloader, but mine came without it.
Loading the boot loader cost me lots of tries, and this is what ended up with, which worked like a charm:
Essentially, the instructions came from here, but with my lack of experience, I thought it could be explained better:
I connected my Arduino Uno (r3) like this to the new boot loader-less atmega328 like this:
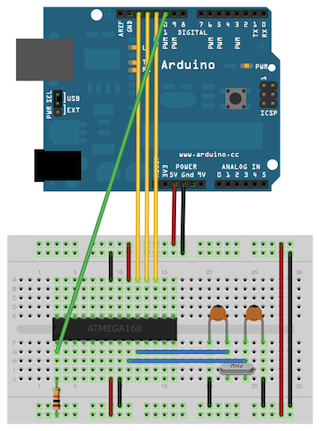
I did not have a crystal, but I had a 16MHz resonator, so I connected the middle pin to ground, and the two side pins of the resonator to pin 9 & 10 of the Atmega328, called OSC1 and OSC2.

It looked like this:

Now to get the bootloader loaded:
Open Arduino IDE, connected via USB to the Arduino. It does not matter which sketch you have open. From Arduino menu, make sure your correct serial port is selected (as you would normally do for uploading your code to Arduino).
Now, also select Tools -> Programmer -> Arduino as ISP
And... Tools -> Burn Bootloader
Done. Now you have a micro controller you can plug into your Arduino One (or other), and program as you would normally do.
And once programmed, you can simply plonk it on a breadboard and use, for example like this:

Note the Arduino Uno to the left is simply my 5V supply, and the LED + resistor simply my pin 13 flashing LED to prove that it's working as planned.
It's possible to run the Atmega328p using it's internal clock, but I decided that for my applications, I'm not going to bother... yet :)


Comments
Post a Comment